|
This is a very cool project done by my great, and clearly crafty, friends, Matt and Erin. I love the mix of industrial materials and wood. I am a huge fan of contrast, you just can't go wrong with it. Black and white, yes and no, hot and cold. Classic examples. Kind of sounding like Katy Perry there. 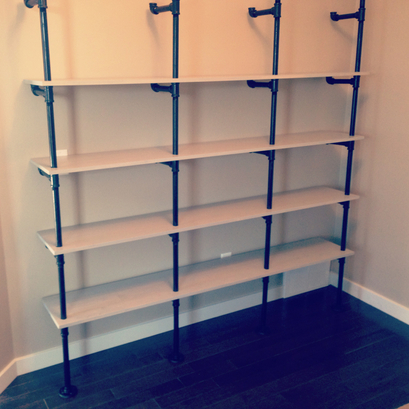 Matt send me this picture below, asking what to do with all these pipes, and immediately, I thought of shelves, which is exactly what they were planning. Great minds definitely think alike. 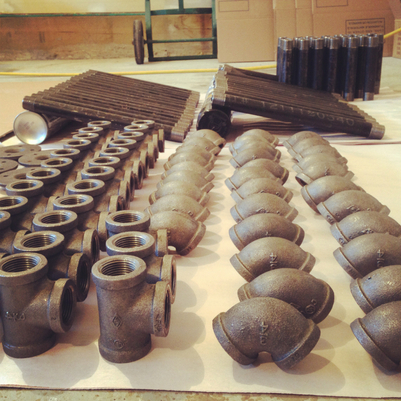 Since this was a project done by Matt and Erin, I had some very serious questions for them. Jena: So all in, about how much do you think this cost you? (Approx?) Matt: $557.56 Jena: Breaking it down, what was the cost of the plumbing supplies? Matt: ~$320. ¾” T’s, 90’s, Flanges, and of course.….6” and 12” nipples. Jena: Big nipples. 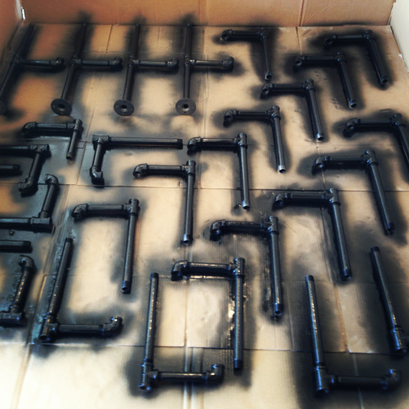 A quick spray paint job turns these industrial plumbing pipes into something a little more. Jena: What was the cost of the wood? Matt: ~$125 Pine, pre-sanded, tongue and groove veneered. After much searching I selected veneered wood as it seems the most stable and least amount of prep time. It also provides an interesting look with all the random grain structures. Jena: Well, it looks awesome, that searching paid off! 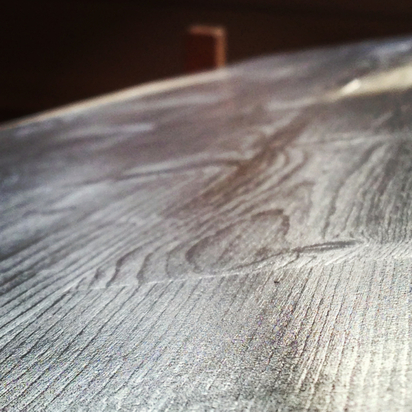 Lovely grains in the wood Jena: What about paint & other stuff? Matt: ~$110 Jena: What paint (and other stuff) did you use? Matt: 1 Coat - Minwax Water Based Stain, White base with 7 shots of black. 3 Coats - Varathane Semi-Gloss Polyurathane 2 Coats - Tremclad Gloss Black Spray Paint (pipe) 220 Grit Sandpaper Tack clothes Foam Brushes Staining Sponges Jena: Good to know, that lays it out well. Copy and paste. Shopping list done! So, where do I pick up the supplies? I mean, where did you pick up the supplies? Matt: Plumbing - Emco Supply Wood – Windsor Plywwod Paint & Others – Your local hardware store 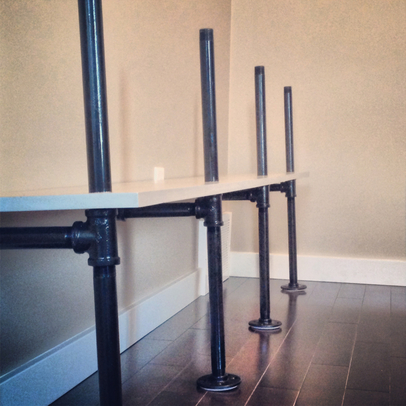 Coming together nicely Jena: How long did it take you? This includes beer drinking and breaks... Matt: Probably about 40 man and lovely wife hours! Jena: Any challenges? Matt: Get yourself 4 hands and 2 less beers for assembly. Years ago I swore I would never buy plastic anchors again. Purchase good wall anchors preferably made with metal components. My first ones were plastic junk and blew apart….again. Jena: Are there things you might do differently the next time? Matt: Lights are always fun. It would have been nice to run some wiring through the piping and have overhung accent lighting on the books. It can still be done ;) Because it is 9 feet high, with all the arms are cantilevered, it could have been anchored to the wall somewhere in mid-shelf. A good engineer would have done a free-body diagram and figured this out first! Jena: Any Tips? Matt: Make sub-assemblies like in the photo. Final assembly will be much easier with less chance of wrecking walls and floors. 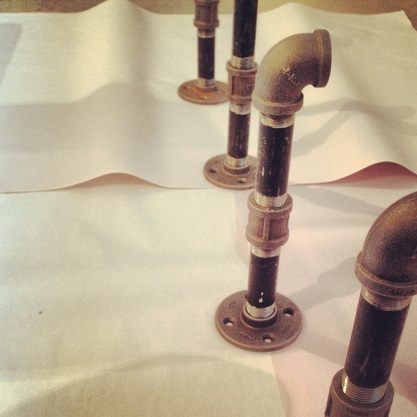 Make sub-assemblies. Great tip! Jena: That's a great tip, I probably would have thought of doing that after I finished putting it all together and my walls needed patching. Any other tips? Matt: Purchase all the gas fittings from one supplier to keep the assembly consistent (they are all NPT thread but the length varies) On a smaller shelf, to save some $, you could use ½ piping. Measure, measure, measure…….measure! I have about a hundred more tips but I don’t want to ruin the excitement of your own build. 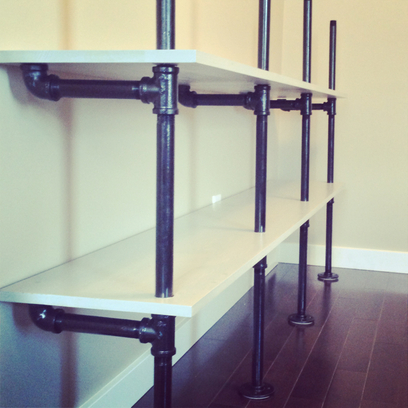 Jena: So after it was all finished, what was your favourite part about it all? It obviously looks really great! Matt: I love learning how to do stuff. This was my first wood working attempt and it turned out as envisioned. Jena: Your first?! I'm impressed. Clearly, it comes pretty natural to you. Is there anything else for next time? Matt: If it was a center piece, display shelf, or focal point of a room, I would introduce different shelf spacing. This would provide a home for the mixture of art, televisions, flowers, and storage boxes we all have. Jena: That would be really cool, I just might have to either try it out or just get you to make me one! What was your inspiration for this project? Matt: I finally remembered what my inspiration was…..the always overpriced ($1928.69 USD) and often under constructed Crate and Barrel shelf (pictured below). I almost knocked it over checking the price tag so how could I ever put books on it? 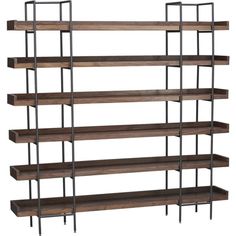 Beckett Shelving Unit by Crate and Barrel Jena: Sorry, Crate and Barrel! Looks like handcrafted wins out! This has definitely given me an idea for a piece I'd love to have in my living room! You guys did a great job, and I can't wait to see it in person! 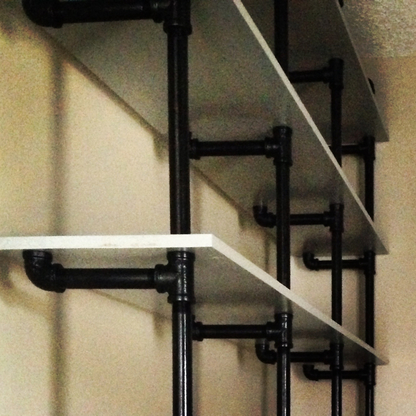 The masterpiece! Huge thanks to Matt and Erin for sharing this project with me, and
I look forward to seeing more! Stay tuned.... Any projects you have that you'd like to share on my blog? Let me know! And thanks again for reading! Jena xo
0 Comments
Shelf Styling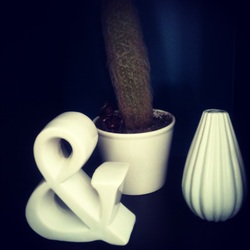 When styling a bookshelf, I'd like to say I've got some set out formula or theory behind it, with layers and contrast and "30% blank space". I've read that, and while I agree with the importance of having some blank space, you might have it down to too much of a science if you follow that precisely. I prefer an easier going approach of just 'make it look good'. I do try to follow the rule of three to a grouping though. It's a formula that is basic enough, and it's hard to go wrong.  I love adding pops of colour into decor. Isn't that what decorating is all about? Using what you love? I got this bowl from my lovely sis-in-law, and I love having it as a centerpiece on our bookshelf. It's funny, but when you have something you love, the other things you pick out just seem to work with it. I admit, I didn't do it on purpose that my favorite painting and our kitchen curtains and a few other accents all match to this bowl, but that's just how it works out when you go with your heart and buy the stuff that you are drawn to.  Red Pod Vase in Assorted Sizes design by Cyan Design - $65.00 from: Burke Decor LLC 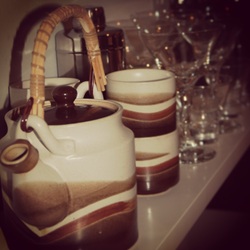 Our kitchen is a little on the small side, so we added a couple of shelves and voila! A little extra storage. But when you are displaying functional items, it's easy for that to get a cluttered look. I try to keep the look uncluttered by having one colour as a starting base, and then keeping the rest very simple and light. Glass is great to use in a display because it works as a filler, but because it is clear, it keeps the display clean and uncluttered. 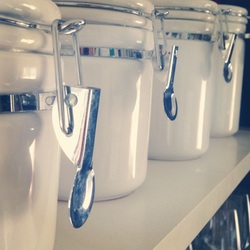 Having a grouping of similar containers is great for displays too, it's basically a laid out, fool proof way to display those functional items. You can't go wrong with lining up the flour, sugar and salt in a simple, matching row of containers.  Covered Jars With Chalk Surface by Canvas - $28.00 from: Burke Decor LLC Countertop Styling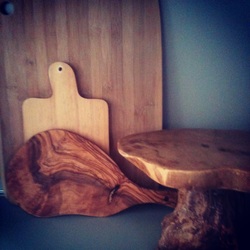 I generally do not like anything on the counters that doesn't need to be there. The coffee pot is ok. The spice rack won't fit into a cabinet, so it's ok. It drives me crazy that our internet router is on there, but it's our only phone outlet, so it'll have to stay. Just lately, I've given in and added a few functional decorations onto the counters because it will distract you from our hideous counters. They are pretty bad. I actually painted an area of the counter with left over paint from the bathroom because I am hoping that paint chips off and starts looking really bad, and we bump the counters to priority on our To-Do list. But until then, I am distracting you with these beautiful wood cutting boards and this really funky wood cupcake stand my sister bought me. Hopefully you are distracted enough to not notice a half painted, fully counter. What was I thinking?  Taste Bamboo Cutting / Serving Board design by Sagaform - $18.95 from: Burke Decor LLC 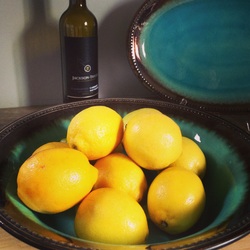 Another display that has gotten onto my counters is this one here. Sometimes you just need to display beauty, and we all know what you have to do "when life hands you lemons..." Display them. And again, something just works about that rule of three. Even though that bottle of wine is temporary. I'll have to replace it with a bottle of tequila, which would be a much more permanent piece in my books, and it matches better with those lemons!  Set of Three Silver Hammered Bowls design by Twos Company - $120.00 from: Burke Decor LLC 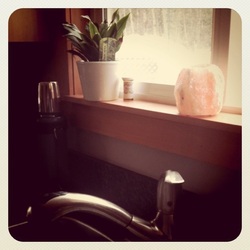 Plants are great to display in a kitchen, and the window ledge is a perfect place for that. I love adding greenery to kitchens, and it's great to have fresh herbs on hand. 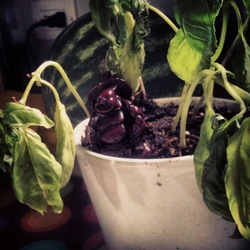 Hope you have better luck than me though!! Poor basil... I try. Maybe I should try fake plants?  Peony Anemone White in Ceramic Vase Cluster - $294.00 from: Burke Decor LLC Above the Cupboard Styling Above the cupboards is kind of a under-utilized space sometimes for a lot of people. It's too awkward to store the functional items, unless you are tall or you are down with grabbing ladders every time you need something. Really, it is a great place to shamelessly display a great collection. The important thing is to have a theme though. It would be easy to create a haphazard display if you didn't have a clear direction of what your over the counter theme is. Whether it is a certain colour, or a salt and pepper collection, you need to keep it focused, or you could create a monster. Unless that's your theme.... 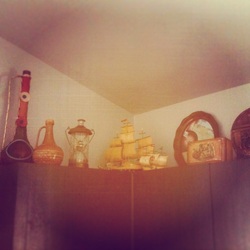 We are in the process of finishing our basement, and we are doing a pirate theme down there. We have started a collection of all things
pirate-y, which I've had to store on the tops of our kitchen cabinets until we are ready to start decorating the pirate ship, which we now refer to our basement as. It will be including everything from the gang plank, treasure chests, skulls and whisky barrels; completed with a cannonball hole in the wall or something. You think I'm kidding? Eye patches are not optional in our basement. (http://pinterest.com/jenakeenan/a-pirates-life-for-me/) So until then, I've got some serious pirate styling going on in the kitchen. |
